Introduction
I've done a lot of searching on the web on how to get web2py working on webfaction, and saw a lot of forum messages with all kinds of complicated instructions that don't really get to the point.I've been using Webfaction to host my web2py applications
Update special mention goes to PythonAnywhere which actually supports Web2Py out of the box (i.e. there is an installer for web2py available). Web2Py.com is actually being hosted on PythonAnywhere now.
The main reason I went with Webfaction was that they had a data center in Singapore. I've been with them for a month now, and am very happy with the features, performance and availability, as opposed to say, Heroku, or Amazon AWS. I spend $200+ dollars a week on transport alone. At $9.50 a month, and 60-day no questions asked refund policy, what more can you ask for? Sign up and try for yourself!
Python hosting is really much more flexible than most!
Webfaction Configuration
There are really only 3 major things that matter:Domain
- Add a domain, or use your existing one, which is like username
.webfactional.com
Application
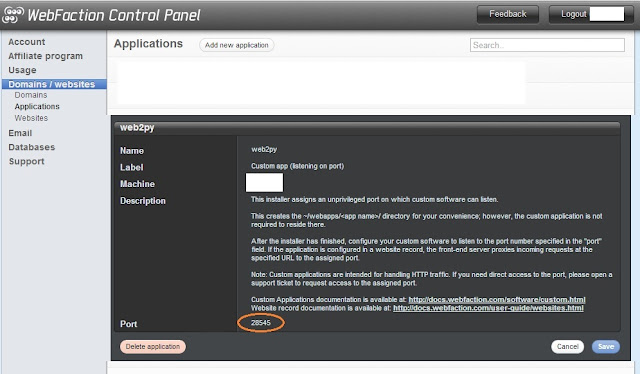
- Add a Custom application (listening on port) - yes, I called mine web2py.
- $HOME/webapps/web2py will be created
- cd $HOME/webapps/web2py
- Fetch the web2py source using Git. These commands are my personal preference; you can do whatever you are comfortable with.
- git remote add origin https://github.com/web2py/web2py.git
- git fetch origin
- git checkout -B master origin/master
Website
- Add 2 websites:
- Add these 2 separately:
- Normal website (http)
- Encrypted website (https)
- In the Domain field: fill in the domain that you have just created. Note: the same domain can be used for both Normal and Encrypted websites.
- In the Contents field: Reuse an existing Web App - choose the web2py app created earlier.
 |
| web2py application settings; note the port number, your web2py instance will have to listen on this port. |
Starting the web2py app
Webfaction's frontend (actually an Nginx proxy) will send incoming requests for your domain to the port that it has allocated for the application. This means that you can run the web2py appliance as normal, listening on the allocated port.Let's use the following settings for the purpose of illustration:
- export APPN=web2py
- export PORT=12345
First run
The most straightforward way of starting the app is:cd $HOME/webapps/$APPN; python web2py.py -p $PORT
Subsequent runs
Use the -a "cd $HOME/webapps/$APPN; python web2py.py -a "" -p $PORT
Keeping it alive
You need to keep the app running, preferably forever. How do you keep the app running after you've logged out from the SSH shell?
Option 1 - Screen
Use the screen utility.
- Start screen: screen
- Start the web2py server as before.
- Log out.
Your app will still stay up, but unfortunately, will not survive a server reboot.
Option 2 - Cron
Create a script in $HOME/bin/startweb2py (please change the PORT to your own port) This script will only start web2py when it is not detected at the allocated port.export PORT=12345Put this in your crontab (use the crontab -e command)
export APPN=web2py
curl http://localhost:$PORT/ >/dev/null 2>/dev/null || {
python $HOME/webapps/$APPN/web2py.py -a "<recycle>" -p $PORT
}
@reboot bash $HOME/bin/startweb2py # starts this when the server reboots
@hourly bash $HOME/bin/startweb2py # run every hour in case the server goes down unexpectedly
Advanced Topics
You can try running web2py with other supported servers. There might be some differences in terms of memory usage and performance.
Look into the Servers class in anyserver.py: currently supported options are cgi, flup, wsgiref, cherrypy, rocket, paste, fapws, gevent, bjoern, tornado, twisted, diesel, gunicorn, eventlet, mongrel2, motor, pulsar
e.g. assuming the PORT environment vairable has been set with
export PORT=12345
- python anyserver.py -p $PORT -s gunicorn
- python anyserver.py -p $PORT -s eventlet
- python anyserver.py -p $PORT -s tornado
ps -u $USER -o pid,rss,cmd
2 comments:
Thank you, this was of great help!
Post a Comment